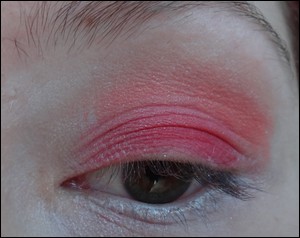
So originally this was meant to be a bright, cheerful sunset... then I added too much of a colour, thought I had ruined it, but it actually turned out ok... does this happen to anyone else?? lol. But I went ahead with a step by step anyway just for the sake of it. If I left out the black to begin with it would have probably turned out a whole lot brighter.
I used all Makeup Geek eye shadows...
here is the review & swatches for them!
Read on if you want to see how I did this. Also another pic heavy warning!
Apply your primer and a white base all over and underneath. I used Nyx JEP Milk.
Apply Razzleberry to the lid with a flat shader brush. Don't worry for now about it looking messy, that'll get fixed up as you go along ;)
Then with a deluxe crease brush apply Mandarine to the crease blending into the lid colour.
Above that blend Chickadee, going into the inner corner a little bit.
Repeat steps 2-4 again until you have reached your desired intensity. Blend Chickadee with Vanilla Bean if you need to soften the edges
Blend Razzleberry + Mandarine onto the lower lashline.
Using a pointed crease brush apply Corrupt into the outer v. I also highlighted with Shimma Shimma on the browbone & inner corner.
Blend the outer v but not so much to lose the definition. Apply your desired eyeliner, going in as far as you like. I used a cream eyeliner duo from Smashbox.
Finish the wing & extend it as long as you like, drawing it back onto the outer of the waterliner.
Fill in your eyebrows if you haven't done so already & apply your favourite mascara or falsies. Ignore my lack of eyelashes lol.
I then thought the black was off and slowly blended it into the crease a bit too much, so I applied Burlesque over the top. This gave it that "burnt" effect. It also brought out Chickadee a lot more too. Yayy.
More Pictures~~
Face: As of this moment I am trying to use up a whooole lot of really old products so my foundation & concealer is different from normal. I have pretty much only been wearing this cream blush by Rimmel & blush by BYS. I have also been using a contouring powder from Nude by Nature and highlighting pearls by BYS.
Top L-R: Razzleberry, Manderine, Chickadee
Bottom L-R: Corrupt, Vanilla Bean, Shimma Shimma. Not pictured: Burlesque.
Man my camera really pulled the brightness out of the colours! To be honest the pans don't look that bright IRL, and chickadee is a bit more orangey.
Eyeliner: Smashbox cream duo. Bourjois Curling mascara. Brows: ELF Eyebrow kit in Medium.
The lipstick is also something I have been trying to use up & its by Mirenesse I don't actually mind it with this look.
Thanks for looking and TIA for any comments <3 <3


